At Laurus College, our business programs offer three classes focused on the Microsoft suite of software. Our program covers Microsoft Word, Excel, and PowerPoint, each of which provides essential capabilities for success in the business world. These courses give students a comprehensive understanding of how to utilize these tools.
I’m Wendy Flores, the director of General Education here at the college and in this series going to be sharing some tips for using these tools that are going to make you more productive and effective.
The first in this series is Microsoft Word. Microsoft Word is one of the most widely used word-processing programs in the world. It’s an essential tool for businesses, students, and anyone who needs to write or edit text documents. With Microsoft Word, you can create professional-looking documents quickly and easily with a range of features that make it easy to format text, add images, create tables, and more.
Versions of Microsoft Word
At Laurus College, we provide our students with Microsoft Office products as part of the program. However, it is worth it to know that there are three different versions of Microsoft Office you may come in contact with.
Office 365 – A cloud-based subscription service that delivers Microsoft’s most up-to-date, feature-rich, modern productivity tools direct to your device. There are variations of Office 365 for business, educational, and personal use. Office 365 offers extra online storage and cloud-connected features, as well as updates with the latest features, fixes, and security updates.
When using Office 365 be sure to download the applications to your computer. They’ll run much faster that way!
Office 2019 – Microsoft’s “on-premises” version of the Office apps, available for both PCs and Macs, offered as a static, one-time purchase outside of the Office 365 subscription model.
Office Online – A free, simplified version of Office web applications (Word, Excel, PowerPoint, and OneNote) that facilitates creating and editing files collaboratively. This version is free for anyone so if you’re ever on someone else’s computer or something you have the option to use these programs absolutely free. The downside is that this version isn’t going to give you the full experience and are a little bit limited.
Entrepreneur’s Tools for Microsoft Word
- Changing Themes and Backgrounds
- Transform Text to Web Page
- Using the Clipboard
- Rewrite Suggestions
- Pin Documents
- Dictate
- Sorting and Auto List
- Formulas
- Collaborate
- Convert to PDF
This article will tell you about tools that are helpful when using Microsoft Word. It talks about things like changing the look of your document, copying and pasting, getting help with writing, saving documents in a special way, talking to type your words, making lists automatically, doing math with formulas, working on a project with other people and turning documents into a PDF.
#1 Changing Themes and Backgrounds
Changing the theme and background of a document in Microsoft Word can be extremely beneficial because it allows users to customize the look and feel of their project. This can make documents more visually appealing and professional, which is important for impressing clients or hiring managers. Furthermore, it helps to create documents that stand out from the rest and draw attention to essential details.
To change your theme, go to File and select Account. From there, you can find a variety of themes and backgrounds under the Office Theme drop-down. Select the one that best suits your project and click Apply to instantly update the look of your document!
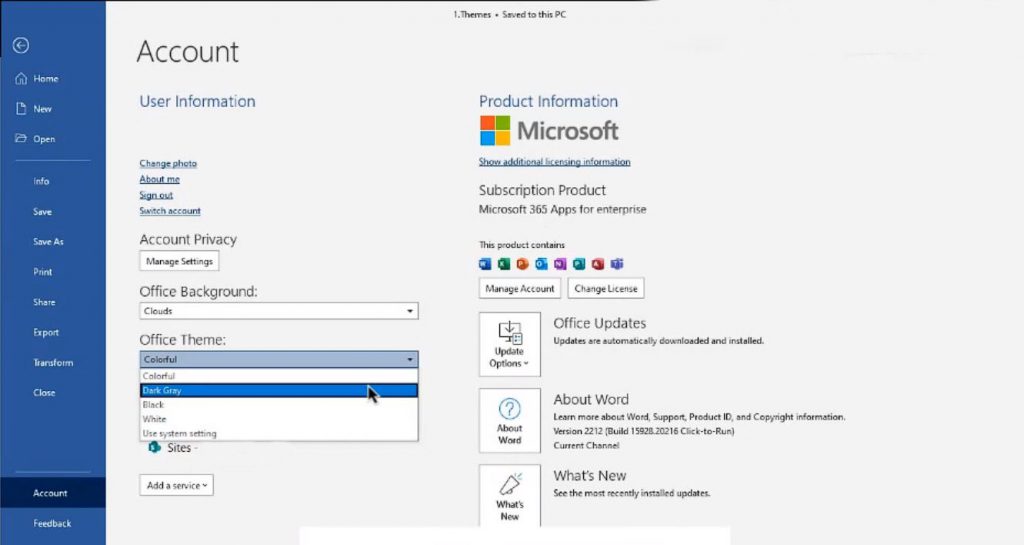
One of the most useful features in Microsoft Word is dark mode. Dark mode allows you to switch from a white background with black text to a black background with white text. This can be beneficial for many reasons, including reducing eye strain and making it easier to read documents in low-light conditions.
You can also change the background of your program by using the Office Background dropdown. This will change the design shown in the status bar at the top of the program.
#2 Transform Text into a Web Page
You can use Microsoft Word to create web pages with the click of a button. Creating a web page from a Microsoft Word document can be a great way to share your document with others online. A web page has the advantage of being viewed on any device, from desktops to tablets to smartphones. It can also be easily shared via email and social media with just one click. This can be a great way to demonstrate your projects online or create an interactive presentation with text, images, and multimedia elements.
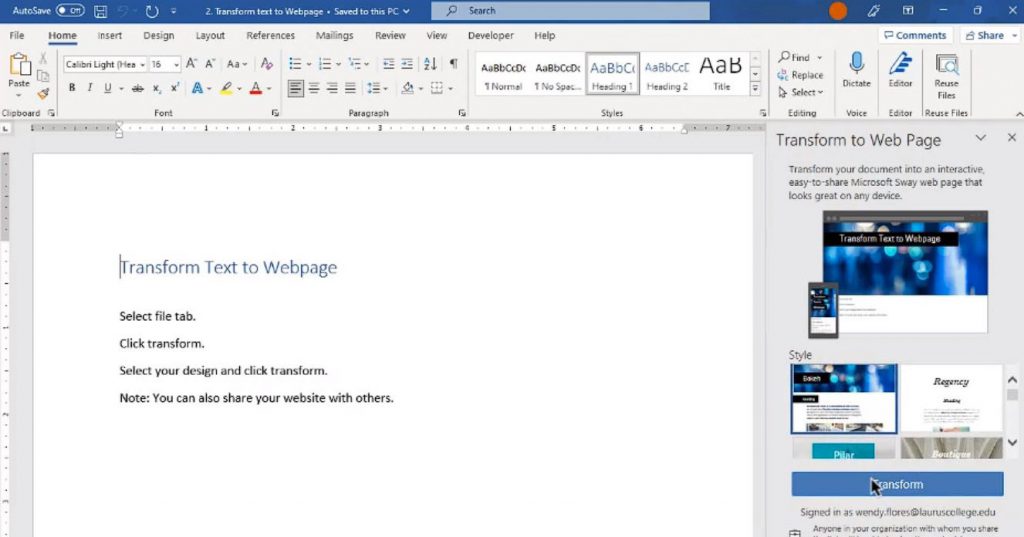
To transform your text into a web page, click File and select Export. From there, you can select Web Page as your file type and then customize the look of the page with HTML code or CSS stylesheets. This will allow you to choose between different fonts, colors, backgrounds, and other design elements. You can scroll through the options to find the design you want before clicking the Transform button.

Sometimes it can take a little while after you click the Transform button to transform all your information into a web page, so be patient. Once your web page is ready it will open in your default web browser. You can edit the page in Microsoft Sway or share it with others!
#3 Using the Clipboard
The Clipboard in Microsoft Word is a useful tool that helps you quickly and easily copy, cut, or paste text. This can save time when creating documents because it eliminates the need to manually type out long passages of text or re-write them multiple times. The clipboard also allows users to quickly transfer data from one document to another without having to manually enter all of the information again. Additionally, the clipboard makes it easy for users to share sections of their work with others by simply copying and pasting the desired text into an email or other file format.
Highlight the text you want to copy using the mouse. Then use one of these methods to copy the text: Use the buttons on the top right of the home tab, right-click, or use the shortcut Ctrl + C.
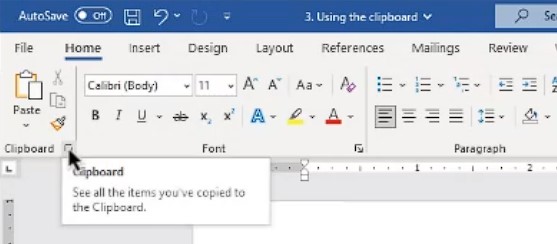
When you’re ready to paste and work with your copied text, you can open up your clipboard. Click the small launcher arrow on the bottom right of the clipboard group on the home tab.
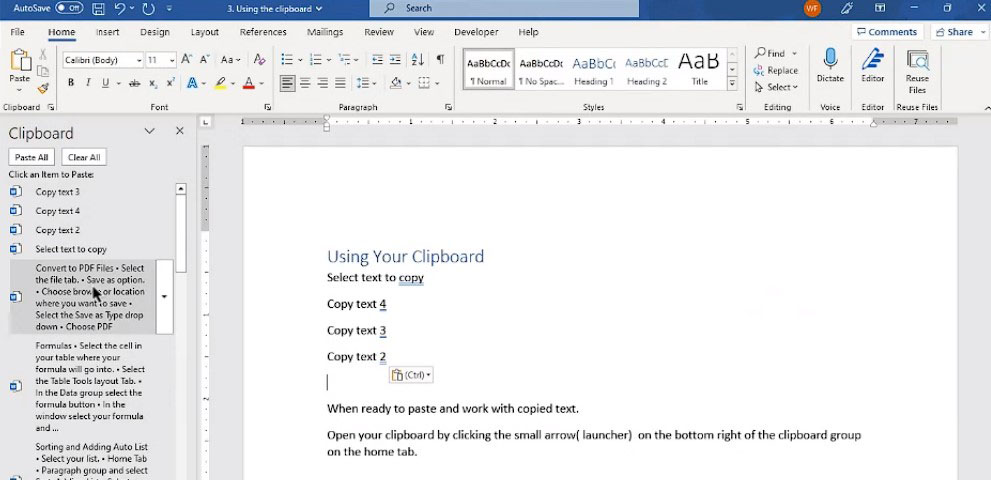
The clipboard will save all the text, images, and more that you’ve copied. You can click the item to automatically paste it into your document.
#4 Rewrite Suggestions
Rewrite suggestions in Microsoft Word are a great way to make sure your documents are error-free and professionally written. This feature provides automated corrections for common mistakes such as grammar, spelling, punctuation, capitalization, and more. Rewrite suggestions can also help you improve the clarity of your writing by suggesting alternative words or phrases that convey the same meaning more effectively.
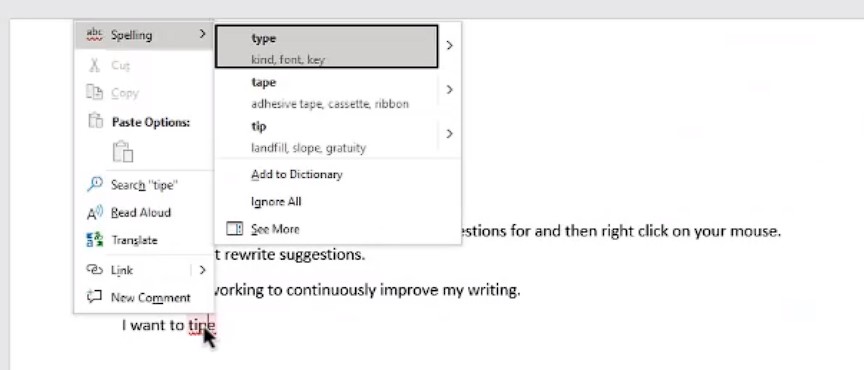
As you’re typing in Microsoft Word the software automatically checks for spelling and grammar errors. If you make an error it will put a squiggly red line under the word. By right-clicking on that word you will get a menu that shows potential fixes.
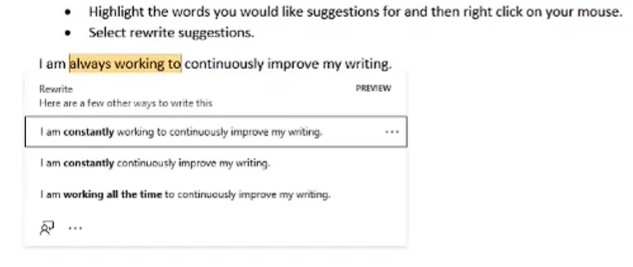
Highlight the words you’d like suggestions for, right-click your mouse and choose the rewrite suggestion. For example, I’ve selected “always working to” in the text below. The Rewrite suggestions show the possible replacements. Clicking the option you like best will cause Word to automatically place it into your document
#5 Pin Documents
Pinning documents in Microsoft Word is an incredibly useful feature that can help you stay organized and increase your productivity. It allows you to keep important documents at the top of your document list so that you can access them quickly and easily. All you have to do is click on the pin icon at the top of a document to “pin”
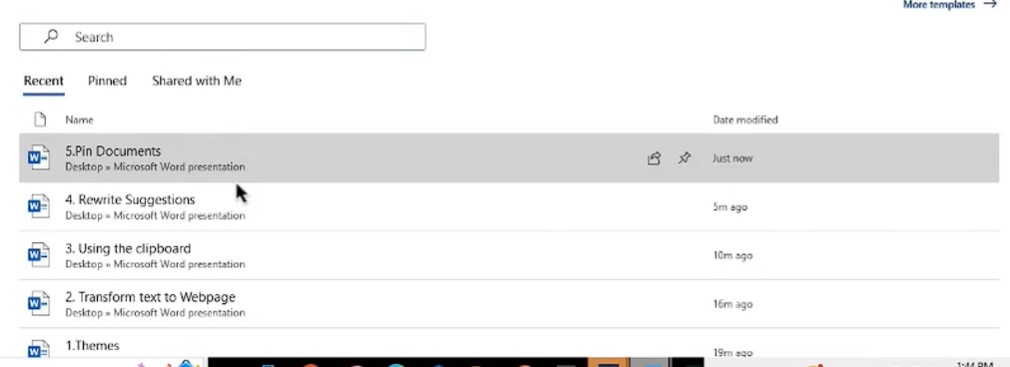
Go to File then click the “pin” icon next to the document in the list.
#6 Dictate
Dictation in Microsoft Word is a powerful tool that can help you save time when writing documents. It allows you to quickly and easily convert your spoken words into text, eliminating the need to manually type out long passages or re-write them multiple times. This feature also makes it easy for users to share sections of their work with others by simply dictating the desired text into an email or other file format. With dictation, users are able to capture their thoughts faster than ever before and make sure that they don’t miss any important details while typing out documents.
Dictate is only available for Office 365 so you won’t be able to use it in 2019. Macintosh users will also not have this function built into Microsoft Office, but MacOS has its own built-in dictation software.

Choose the Home tab and select the microphone icon in the Voice group. Once you’ve selected the dictation icon choose the microphone icon in the popup box and wait for the recording light to come on. Start dictating what you want to be written. Be aware that you will have to give punctuation commands such as commas, periods, and semicolons similar to dictating a text message.
#7 List Sorting and Adding Auto List
If you’ve ever created a list and you need quick sorting, Microsoft Word can do that for you! List sorting in Microsoft Word is a great way to easily organize and manage lists within a document. With the list sorting feature, you can automatically sort the items in your list alphabetically, numerically, by date, or even by custom criteria. This makes it easy to quickly find the item you’re looking for or compare different items within the list.
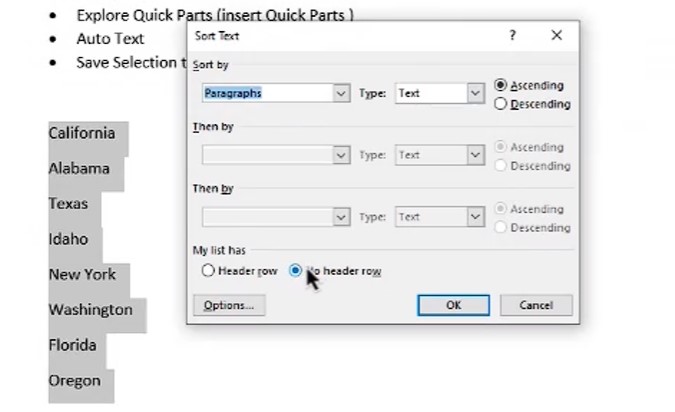
To sort a list, first select the list. Then choose the Home Tab and select Sort from the paragraph group. This will allow you to sort by different categories. For example in the screenshot below I’ve sorted this list of states by paragraphs (because they are each a paragraph) as text in Ascending order (meaning A-Z). You can also sort this by numbers as well by setting the type to Number.
Auto Lists
Adding an Auto List to Microsoft Word is also a great way to save time and keep your documents looking clean and organized. When you use an auto list, Word will automatically format lists within the document using different bullet points or numbering systems. This makes it easy to quickly add new items without needing to manually adjust the formatting of your lists.
To create an auto list, select the text you want to make into a list. Go to the Home tab, select Bullets or Numbering from the Paragraph group, and choose one of the options. You can also customize your lists
Quick Parts
You can also save lists into your Word Program using something called Quick Parts. Quick parts allow you to save different types of content, including auto lists, so that you can quickly access them when needed. To use this feature, simply choose the list you want to save and select Insert > Quick Parts > Save Selection to Quick Part Gallery from the drop-down menu.
Now, whenever you need to add a list in Microsoft Word, you can quickly and easily insert it by selecting Insert > Quick Parts > Saved List from the drop-down menu.
#8 Formulas
Formulas in tables are a great way to quickly and easily calculate numerical values within Microsoft Word documents. By using formulas, you can quickly add up totals, calculate percentages or averages, compare values side by side, and more. Formulas also make it easier to update your document if the data changes over time as the formula will automatically adjust itself based on the new inputs. With formulas in tables, you can save time and energy when dealing with large amounts of data that needs to be analyzed or manipulated.
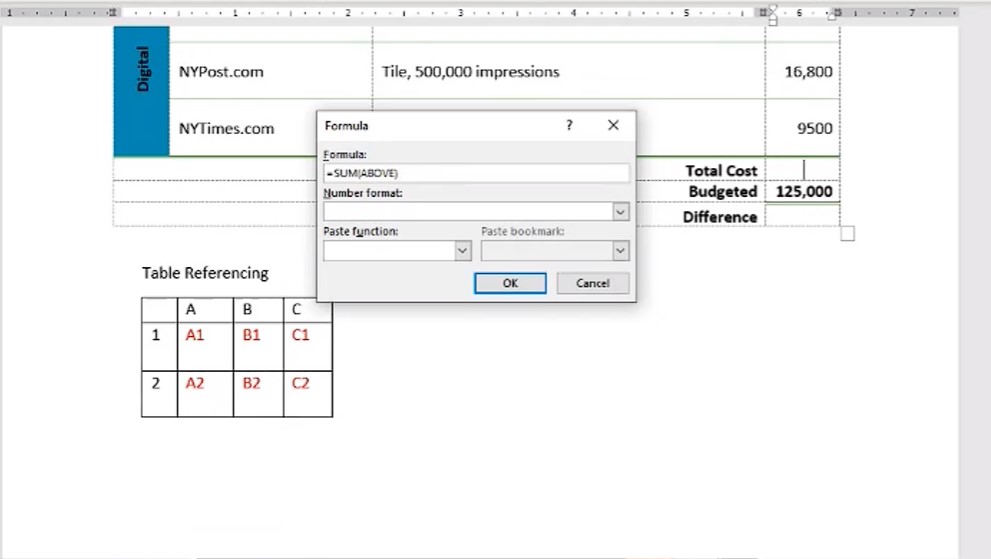
- Select the cell in your table where your formula will go
- Select the Table Tools Layout Tab
- In the Data group select the Formula button
- In the window select your formula and range
#9 Collaborate
Collaboration tools in Microsoft Word make it easy for multiple users to work on a single document at the same time. These tools allow users to share, comment, and edit documents quickly and easily. In addition, these tools also provide advanced features that make it easier to understand changes made by different users.
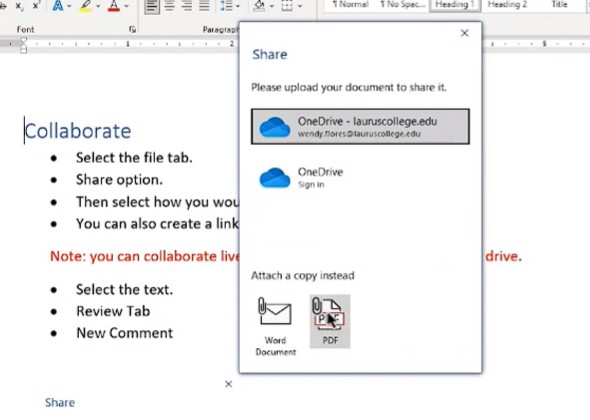
Select the File tab then choose the Share option. You’ll need to connect and upload your document to OneDrive. In the Invite People field, type in the emails of those you want to share your document with. You can choose different permission levels for each user including Edit or Read Only.
#10 Convert to PDF
Microsoft Word can easily convert a document into a PDF. The Portable Documentation Format (PDF) is a common software-independent document format that allows you be sure anyone without Microsoft Word will still be able to open your work. One of the primary reasons someone might want to convert a Microsoft Word document to a PDF file is for increased security. PDF files are far more secure than other file types, as they are designed to be platform-independent and can require passwords or digital certificates to open the documents.
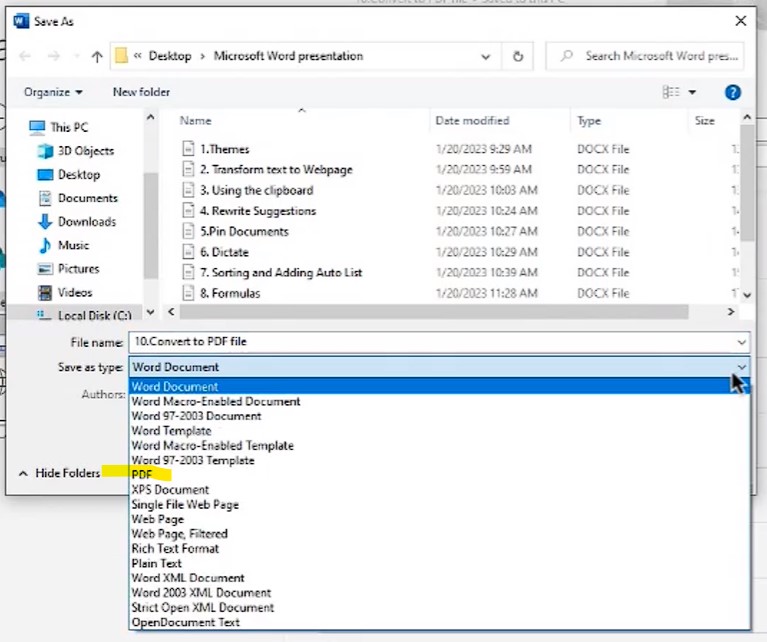
To convert your document to PDF, select the File tab and choose the Save As option. From the Save as Type menu select PDF Document. Finally, choose where you want to save your document and click Save to convert it to a PDF file type.
These 10 productivity tips for Microsoft Word should help you work faster and more efficiently with your documents. From auto lists to collaboration tools, there are plenty of features that can be used to help save time when creating or editing a document in Word. With the right knowledge and practice, you’ll find yourself completing tasks quickly while still producing high-quality results.
Next time we will be discussing tips and tricks for Microsoft Excel!
